How do I Install a Ball Coupler on My Trailer?
2025-02-25 14:41:02
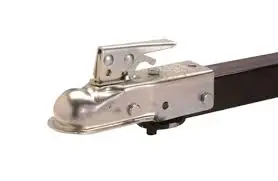
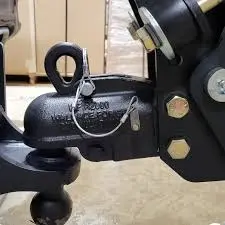
Installing a ball coupler on your trailer is a crucial step in ensuring safe and secure towing. A ball coupler for trailer connects your trailer to the tow vehicle, allowing for smooth movement and proper weight distribution. This blog post will guide you through the process of installing a ball coupler, covering essential steps, tools required, and important considerations. Whether you're a DIY enthusiast or a professional in the urban furniture manufacturing industry, understanding the proper installation technique is vital for maintaining trailer safety and efficiency. Let's dive into the details of how to successfully install a ball coupler on your trailer.

Preparing for Ball Coupler Installation
Selecting the Right Ball Coupler
Selecting the right ball coupler is essential for ensuring safe towing. The coupler should match your trailer’s specific requirements, including its gross weight and tongue weight. Make sure the coupler’s weight rating exceeds the trailer's maximum weight capacity for optimal safety. Additionally, consider the size of the hitch ball on your tow vehicle, as couplers come in different sizes (1-7/8", 2", or 2-5/16"). Opt for a coupler made of high-quality materials, such as galvanized or stainless steel, to resist corrosion and ensure durability under various weather conditions.
Gathering Necessary Tools and Materials
Before starting the installation, make sure you have all the necessary tools and materials on hand. Essential items include a wrench set, socket set, and drill with the appropriate drill bits for mounting the coupler. You’ll also need safety glasses and work gloves to protect yourself during the installation. Ensure that the mounting hardware included in your ball coupler kit—such as bolts, nuts, and washers—is ready for use. Having all tools and materials prepared in advance will help the installation go smoothly and efficiently without delays.
Inspecting the Trailer's Tongue
Before installing the ball coupler for trailer, it’s critical to inspect the trailer's tongue where the coupler will be mounted. Look for any signs of wear, rust, cracks, or damage that might weaken the connection. The tongue should be free of corrosion and structural defects to ensure that the coupler can be securely attached. If you identify any issues, repair them before proceeding. A solid, undamaged trailer tongue is vital for maintaining a strong and stable connection between the trailer and the tow vehicle, which is crucial for safe towing.
Step-by-Step Ball Coupler Installation Process
Positioning the Ball Coupler
Start by carefully positioning the ball coupler for trailer on the trailer tongue at the desired location. Ensure the coupler is centered and properly aligned with the trailer’s frame to prevent any misalignment during towing. Once in place, use a marker or chalk to trace the outline of the coupler, noting the locations for the mounting holes. Take extra care to measure twice and check the alignment before moving forward, as improper positioning could lead to an insecure connection or alignment issues down the road.
Drilling Mounting Holes
After marking the positions for the mounting holes, it's time to drill. Choose a drill bit that is slightly smaller than the diameter of the mounting bolts, allowing for a tight fit. Begin by drilling pilot holes at the marked spots, ensuring accuracy and preventing the metal from cracking or splintering. Always wear safety glasses to protect your eyes from metal shavings and work gloves to safeguard your hands. Drilling the pilot holes correctly is crucial for a secure and stable ball coupler installation.
Securing the Ball Coupler
With the pilot holes drilled, place the ball coupler over the holes and insert the mounting bolts through the coupler and trailer tongue. Secure the bolts with washers and nuts underneath the trailer tongue, ensuring everything is aligned correctly. Tighten the bolts in an alternating pattern to distribute pressure evenly across the coupler. To ensure optimal security, use a torque wrench to tighten the bolts to the manufacturer’s recommended torque specifications, usually around 50 to 75 foot-pounds, depending on the coupler model and the trailer's specifications.

Post-Installation Checks and Maintenance
Testing the Ball Coupler
Once the ball coupler for trailer is installed, testing its functionality is essential before hitting the road. Connect the trailer to your tow vehicle and check the fit of the coupler over the hitch ball. Ensure the coupler locks securely into place, with the locking mechanism engaging smoothly without resistance. After locking, give the coupler a gentle tug to verify that it’s firmly attached and there’s no movement. This quick test ensures that the coupler is securely engaged and ready for towing, reducing the risk of mishaps during travel.
Regular Maintenance Tips
Proper maintenance of the ball coupler ensures longevity and safe operation. Regularly lubricate the coupler’s moving parts with high-quality grease to reduce friction, prevent rust, and facilitate smooth locking and unlocking. Before each use, inspect the coupler for any signs of wear or damage, including loose bolts or cracks in the metal. It’s also important to clean the coupler periodically to remove dirt, road debris, and corrosion that could affect its performance, helping you avoid costly repairs and enhancing towing safety.
Troubleshooting Common Issues
While ball couplers are generally reliable, it’s important to be aware of potential issues. If the coupler shows excessive play or movement, it could indicate worn or damaged parts that need replacement. A sticky locking mechanism may signal the need for cleaning and lubrication. Additionally, if the coupler fails to engage properly, check for misalignment or debris blocking the mechanism. In any case of persistent issues, consult the manufacturer’s manual or seek professional assistance to ensure the coupler is functioning correctly and safely for continued use.
Conclusion
Installing a ball coupler for trailer on your trailer is a straightforward process that requires attention to detail and proper techniques. By following these steps and maintaining your coupler regularly, you'll ensure a safe and reliable connection between your trailer and tow vehicle. Remember, proper installation is key to preventing accidents and protecting your valuable cargo. If you want to get more information about this product, you can contact us at info@qdkshd.com.
References
1. "The Complete Guide to Trailer Hitch Installation"
2. "Selecting the Right Ball Coupler for Your Trailer: A Comprehensive Guide"
3. "Trailer Maintenance 101: Keeping Your Ball Coupler in Top Shape"
4. "Common Mistakes to Avoid When Installing a Trailer Ball Coupler"
5. "Safety First: Proper Ball Coupler Installation Techniques"
6. "Troubleshooting Ball Coupler Issues: Expert Tips and Tricks"
Send Inquiry
You may like
